Monday, August 29, 2011

CARA MEMBUAT VSTi

Mungkin ada teman yang tau bagaimana cara membuat Vsti khususnya synth...
sebelum saya menuliskannya, abang2 tau apa itu VSTi ????
VSTi kalau orang kampung seperti saya mengatakan Virtual sound instrument, tp kalau opung wiki bilang virtual sound technology instrument

tanpa basa basi lagi bang, langsung aja
yang di butuhkan :

PC atau Laptop
Dengan spek, prosesor minimum dualcore
Memori / ram minimum 2GB
Hardisk 250 dah cukup
OS Windows
Software Synth Maker

langkah2 :
1. buka Synth Maker, nanti akan ada tampilan awal synth maker dan klik new pada toolbar  - file
selanjutnya akan ada tampilan seperti yang di atas

1. langkah ke 2 adalah membuat program element
untuk memudahkan saya kasih gambarnya seperti ini


langkah ke 3 adalah wiring...
sebelum melakukan wiring abang harus memasukkan dulu midi in, bisa di search di kolom search pada element...
selanjutnya memasukkan module
langkah selanjutnya memasukkan direct output, jangan lupa sewaktu memasukkan midi innya di klik pc keyboard biar bisa di test menggunakan keyboard dari PC... begitu juga direct outnya :D

langkah selanjuutnya abang harus mengklik 2 kali pada module sehingga terbuka jendela tab baru yang kosong. dan lanjut memasukkan midi in trus abang memasukkan midi to poly..
langkah selanjutnya abang harus memasukkan denoiser sebanyak 2, dan di lanjutkan memasukkan mulsti oscilator...

langkah berikutnya abang harus memasukkan ADSR sebanyak 2 buah, dan memasukkan amp gain, combiner, effect ( seperti reverb, delay dan lain2).

langkah berikutnya abang harus memasukkan stereo amp dan di ikuti dengan memasukkan module out...
untuk wiring dalam tahap ini, abang bisa melihat gambar ini aja ya

langkah selanjutnya adalah kembali ke tab awal di mana ada 3 element awal, yaitu midi in, module dan direct out..

nah di halaman itu yang harus abang lakukan adalah menghubungkan midi in ke module, dari module ke direct sound out

untuk hasilnya yang saya buat seperti ini gambarnya

untuk hasilnya bisa di download disini :

www.ferrysiregar.com.dll
ferry.dll
tri2KtableSM.dat
saw2KtableSM.dat

hasil samplenya saya buat baru 2 sound aja, untuk menggunakannya copy semua filenya masukkan di drive vsti plugin anda.. contoh : C://programfile/steinberg/vsti plugin

maaf kalau jelek ya bang. maklum baru belajar :D
selamat berkreatifitas :D

salam

ferry siregar
www.ferrysiregar.com
http://www.ferrysiregar.wordpress.com
www.solfegio.com

Friday, August 26, 2011

Korg Pa 3X

Mungkin para arranger maupun para pemain keyboard, baik untuk perform di cafe maupun Organ Tunggal membutuhkan alat yang baik performancenya, dan ini menjadi salah satu pilihan anda, silahkan di baca2

Better than ever.
The Korg Pa Series has a new flagship: the Pa3X, the most realistic, powerful, and easy-to-use arranger workstation ever produced. For years, Korg’s Pa Series has been the most respected, envied, and successful line of interactive arranger workstations on the planet. Once again, Korg has raised the standard of excellence by offering new, richer, and more realistic sounds; creating amazing new features, and offering a fresh – yet elegant – design. Meet the Pa3X. Listen and Believe.

Pa3X Highlights
  • Enhanced RX (Real eXperience) sound engine offers improved realism and new vivid sound, including pianos borrowed from the acclaimed Korg SV-1 Stage Vintage Piano, plus Ambience Drums 
  • Massive internal ROM – plus up to 256 MB of user PCM data (equivalent to 512 MB*) –provides an extraordinarily powerful wave memory, delivering the best sound quality possible
  • Three assignable switches, a four-way joystick, and our unique ribbon strip ensure total control for the many available levels of sound articulation (DNC) 
  • Choose either 61 keys or 76 semi–weighted keys; both with velocity and aftertouch
  • Elegantly designed and reliable aluminum cabinet
  • TouchView™ TFT display; 76-key model features a motorized tilting display
  • Professional graphic interface with new Search facility for quickly locating musical resources
  • PaAS High-fidelity, optional amplification/speaker bar with Korg’s own Easy Connect system (no support, cables, or additional power supply needed) 
  • Self-refreshing PCM Data memory backup – supported by our own Intelligent Re-Charge system – ensures fast startup
  • Improved Style and Performance selection, Over 400 factory Styles; each with 4 variations and 4 Fill Ins + Break, plus 15 user banks for unlimited storage of your favorite customized or user created Styles and settings
  • Enhanced Guitar Mode 2 for even more realistic guitar parts
  • Chord Sequencer function records any chord progression on-the-fly
  • Up to 8 Stereo Effects at once, including flexible Master and Insert routing for Styles and songs. New Vintage Effectsfrom the acclaimed SV-1 Stage Vintage Piano
  • New TC-Helicon ® Vocal Processor (VoiceLive2 derived) with dedicated professional effects
  • Adaptive Mic Setting provides a virtual sound engineer to automatically set the best EQ/Compressor/Gate settings for your voice
  • Professional Final Mastering tools from “Waves Audio” plugins “MaxxAudio ™ ” suite. 
  • New Double MP3/MIDI files player and recorder with Advanced Vocal Remover. 
  • Enhanced compatibility with Lyrics in graphical format (+G) for MIDI files and MP3 files. 
  • New Audio Chord Detection function that automatically extracts chords to send to the Vocal Processor from MP3 files. 
  • Enhanced sound compatibility for GM songs. 
  • Multi-language extended character set. Lyrics can be showed in their original languages (except the Oriental and the Arabic Languages**).
http://www.korg.com/pa3x
Sumber : 

Friday, August 19, 2011

Membuat Virtual Aksesoris Sound system pada Organ Tunggal (OT)

Membuat Virtual Aksesoris Sound system pada Ogan Tunggal (OT)

mungkin sebelumnya banyak rekan2 atau abang / kakak-kakak awak yang sudah tau atau ingin mengetahui bagaimana systemnya.
Dan sangat banyak sekali khushusnya para pengusaha atau Player yang ingin tampil keren atau ingin memaksimalkan perangkat keyboardnya yang kurang baik dengan membawa laptop ke panggung OT
baik itu untuk memutar sampler atau sampling atau juga bahkan hanya untuk memutar AUDIO seperti MP3 dan lainnya yang penting GAYA...

tapi kali ini saya membuat tulisan bukan untuk sampling, karena artikel yang berhubungan dengan sampling sudah pernah saya tuliskan, yaitu cara mengkonekkan keyboard ke pc yang bisa di lihat disini : http://www.ferrysiregar.com/2011/08/cara-mengkonekkan-keyboard-ke-pc.html dengan menjadikan PC / LAPTOP sebagai sound module yang bisa di lihat disini http://www.ferrysiregar.com/2011/08/menjadikan-pc-laptop-sebagai-sound.html , tapi untuk Virtual aksesories sound system.

apa itu virtual aksesories sound system ???

Virtual aksesories sound system itu, dimana kita menggunakan equalizer, crossover, compressor, limiter, Speaker Management
dan lainnya secara virtual atau menggunakan software..

apa aja yang di butuhkan ya bang atau adek.. itu mungkin pertanyaan anda.
yang di butuhkan :

1. PC atau Laptop yang memiliki spect :
- memori / ram : minimal 4Gb
- LCD : khusus untuk PC
- Hardisk : 350 Gb
- Prosecor minimal di atas core2duo semakin tinggi semakin baik.
- Software Windows ( hal ini karena saya pakai windows jadi sebagai OPTION)
2. - soundcard yang berchanel input dan output yang banyak
3. - software Daw seperti nuendo
4. - Software VST
5. - patch bays
6. - Driver

langkah 2x selanjutnya melakukan penginstalan...
1. instal windows xp pada komputer anda
2. instal software daw seperti nuendo pada komputer / laptop anda
3. instal Driver soundcard pada PC / LAPTOP anda
4. Instal VST pada Laptop / PC anda

setelah melakukan penginstalan, selanjutnya mengkonekkan perangkat..
colokkan soundcard ke PC / laptop anda, pastikan pada saat mengkonekkannya PC / LAPTOP dalam kondisi mati
selanjutnya hidupkan PC / LAPTOP anda...
untuk soundcard yang berinput dan output banyak mungkin ini bisa jadi solusinya, tp sayang untuk saat ini saya belum menemukan soundcard yang USB yang memilki in dan out yang banyak


langkah selanjutnya buka nuendo anda, dan melakukan configurasi....
caranya :
1. buka nuendo seperti pada gambar :

langkah ke 2 klik tulisan device dan pilih VST CONNECTION, yang gambarnya seperti ini di bawah ini :


selanjutnya klik add bus inputnya dan akan kebuka tampilan seperti ini

selanjutnya setelah memasukkan ADD bus di input, pilih di tab sebelah untuk outnya
dengan cara yang sama, yaitu mengklik kembali add bus nya, sebagai catatan nilai count itu, tergantung dari banyaknya input dan output yang di miliki soundcard anda...

setelah melakukan configurasi, saatntya kembali ke halaman utama NUENDO
buat track audio baru sebanayk jumlah yang di inginkan sebagai contoh saya buat 2 track...
bnasik dasar NUENDO bisa di lihat di sini : http://www.ferrysiregar.com/2011/08/tutorial-belajar-nuendo-4.html . selanjutnya klik out pada track dan ganti menjadi out1, 2 dan seterusnya di tiap track yang berbeda
seperti pada gambar berikut :


langkah berikutnya nya TEKAN F3 pada keyboard anda maka akan keluar tampilan mixer NUENDO seperti yang di atas :
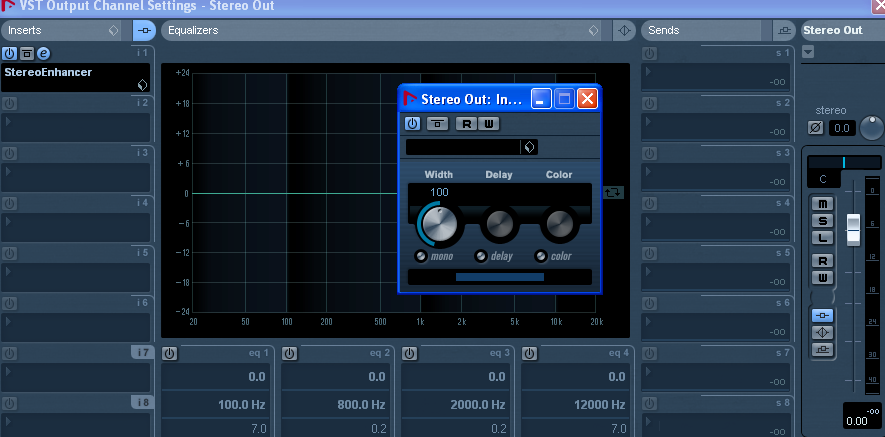
langkah selanjutnya klik symbol e pada track yang ingin di masukkan plugin FX di input tracknya... seperti pada gambar ini dan pilih pluginnya :


setelah anda masukkan plugin di input, lakukan hal yang sama di out per tracknya, untuk memasukan plugin atau sound system aksesorisnya seperti compressor, limiter dan lain2nya dengan cara yang sama, dan hasilnya juga seperti pada gambar yang DI ATAS...

biar semuanya dapat berfungsi maka, di tiap tracknya anda bisa menekan symbol monitor yang di lambangkan dengan gambar speaker atau dengan tombol record yang di symbol dengan tanda bulat seperti pada gambar :


setelah melakukan semuanya, maka anda harus menyimpannya, karena kalau main di tempat lain, tinggal membuka datanya aja,, cukup mudah bukan, jadi anda tidak perlu mensetting ulang alat anda jika bermain atau perform di tempat yang sama :D
jadi dalam hal ini, anda hanya cukup membawa :
1. player
2. vocalis.
3. komputer dan soundcard
4. power
5. speaker
6. stand speaker (optional)
7. keyboard
8. standbook (optional)
9. LCD
10. Dompet untuk pembayaran setelah selesai perform :D wakakkakakak

Untuk lebih keren lagi dalam mengkoneksikan input dan outputnya, anda bisa menggunakan tambahan alat yang namanya PACTHBAYS,, sebagai contoh ini gambarnya :

Selamat Bekerja dan mencoba ya bang, kakak, adek, tulang, amang baru, dan lain2 :D, kalau dah berhasil dan suksess jangan lupa kedan ( kawan ).

Untuk Berdiskusi lebih jauh mengenai hardware perangkat soundsystem dan cara membuatnya ( DIY) abang bisa datang ke www.solfegio.com


Salam
:D
Ferry Siregar
http://www.ferrysiregar.com

Thursday, August 18, 2011

Tutorial Mastering dengan Cepat atau instant

Tutorial Mastering dengan Cepat

Dalam tulisan kali ini saya akan membahas bagaimana caranya mastering audio dengan cepat...
walaupun anda tidak memiliki basic, tapi akan mendapatkan hasil seperti layaknya anda seorang Sound Engineer (SE) Profesional..
Dalam dunia mastering ada beberapa hal pokok yang harus anda pelajari dan ketahui,, antara lain :

1. System Perangkat Recording
2. Membaca system spectrum analyzer.
3. mengetaui dan memahami serta menguasai beberapa FX serta fungsinya..
4. mengetahui dan mempelajari system aksesorie pada perangkat sound system Prosecor seperti :
- DSP Equalizer
- DSP COMPRESSOR
- DSP LOUDNESS
- GATE
- LIMITER
- Dan lain-lain...

tapi dalam penulisan ini.. kalian tidak perlu memahami dan mempelajarinya lebih dalam, karena tulisan saya ini sangat bersifat instant,
mengapa saya bilang instant ???... alasannya karena kkita menggunakan software yang dimana kita dapat mengambil sampler mastering
dari seorang sound engineer dunia tanpa harus menemuinya...
trus bagaimana caranya ?????

Siapkan alat yang di perlukan :

1. Komputer / Laptop dengan OS wINDOWS xP
spect yang di perlukan :
- hardisk minimal 350
- Ram minimal 2Gb tanpa sharing VGA
- Soundcard External, minimal soundcard onboard juga boleh asalkan terpaksa :D
- Software Audio Mastering System...
- Software DAW untuk compresi data menjadi wave audio format dengan resolusi 16 bit

2. Langkah-langkah yang harus di lakukan

ambil sample audio high quality yang anda punya misalkan dengan format mp3, maka anda harus merubahnya dulu dengan software DAW
seperti nuendo, dan jadikan menjadi wave dengan out yang stereo dan 16 bit

selanjutnya buka Software AUTO AUDIO MASTERING SUITE SYSTEM...
lihat pada gambar berikut sebagai contoh :

3. Langkah selanjutnya adalah memasukkan sample lagu tadi yang akan kita jadikan referensi untuk matering lagu... biar kelihatan apa aja nih gambarnya saya berikan

Selanjutnya klik ANALYZED AUDIO AND LOAD SOURCE yang ada tepat di tengah aplikasi AAMSnya..
tunggu beberapa saat hingga selesai..
sebagai catatan jangan gunakan AAMS nya untuk menggunakan fitur yang ada disana ( dalam kata lain jangan ngeklik menu yang lain yang membuat prosess pengambilan data terhambat )..

Setelah selesai melakukan analyzed audio, anda simpan filenya ke folder yang telah anda buat.. atau langsung di system aams yang di program file / source..
Formatnya nanti yang akan keluar menjadi AAM....

4. langkah selanjutnya memasukkan file yang akan di mastering langkahnya klik master pada AAMS.. selanjutnya pilih master single. dan klik auto audio master single file... nanti akan ke buka jendela baru seperti ini :


dan klik di drive dan folder mana data audio wave yang 16 bit tadi di simpan...
selanjutnya akan terbuka jendela baru lagi, dimana anda di kasih pilihan untuk referensi mastering.. pilih di drive dan folder mana file AAM yang pertama kali anda buat kemudian klik open...
seperti pada gambar berikut :


5. Langkah selanjutnya adalah menunggu prosess hingga selesai.. dan lihat hasilnya...
anda dapat juga melihat system data referensinya berupa data word.. dimana terdapat banyak nilai untuk.. DSP EQUALIZER, COMPRESSOR dan lainnya...

Selamat mencoba :D

Salam

FERRY SIREGAR
http://www.ferrysiregar.com

Monday, August 8, 2011

Tutorial (Belajar ) Nuendo 4

Tutorial ini saya buat semata-mata hanya untuk berbagi pengetahuan saya kepada anda.. semoga dengan adanya artikel ini, bisa memudahkan anda dalam bekerja… langsung aja ya brooooooo…………


Software keluaran Steinberg ini berfungsi di tujukan untuk Profesional Recording…. akan tetapi tidak di luar kemungkinan Nuendo 4 dapat di gunakan tuk hal sederhana dalam pekerjaan…. misalnya tuk dalam pembuatan SQUENCER… dimana software ini banyak digunakan oleh kalangan anak band tuk membuat demo mapun hal yg saya bilang tadi…..
oke kita mulai saja… karena anda pasti dah tidak sabar tuk mengetahuinya…
Disini saya menulisnya untuk tutorial membuat SQUENCER / SAMPLING yg di gunakan untuk back up music sound, lagu- lagu party atau rnb ataupun music yg gak mungkin di jangkau dengan keterbatasan personils ( band cafe )
langkah pertama yang harus anda lakukan adalah dengan membuka new project atau pekerjaan baru/ thalaman baru,, terserah lah anda mau mengartikan apa,, pokoknya gambarnya seperti ini :


jadi setelah  dibuka new project anda akan mendapatkan halaman yg kosong, untuk mengisinya kamu tinggal memasukkan track baru. atau ada tinggal mengklik file dah pilih import, setelah terbuka folder computer anda, anda tinggal memilih file yg akan di jadikan guide, untuk membuat Squence lagu tersebut……
selanjutnya apa yg harus dilakukan ?????
Hal yg harus anda lakukan adalah melakukan pencarian tempo, dan mengaktifkan metronom dengan mengklik tulisan klik di navigator hingga berwarna orange… seperti gambar ini : jangan lupa pastikan tombol metronom dah aktif… dan pada tulisan tempo menunjukkan tulisan FIXED, saya juga menyarankan anda tuk mencari birama lagu tersebut… disini saya memberikan contoh 4/4 dengan tempo 130.070. . setelah guide terdeteksi dengan metronome secara benar… selanjutnya kita memasukkan file midi atau pun wafe yg akan kita gunakan sebagai drum… disini untuk project SQUENCER BABY.. saya menggunakan midi sebagai drumnya dan memasukkan file2 yang sudah saya buat di software lain dengan format wave. untuk contohnya seperti gambar berikut :


sudah di lihatkan friend ????
nah untuk penjelassannya, di track 1 saya gunain sebagai guide, di track 2 file yang saya inserta berupa wave, yg saya gunakan sebagai sound synth… untuk pembuatannya saya menggunaklan software lain
di track midi, saya gunakan untuk drum dan pizzicato strings….. yg saya gunakan sebagai komposisi mini untuk orchestra… cara membuatnya dengan mengklik gambar pena atau pensil dan membuat drag jarak bar yg akan kita buat. setelah di buat. tinggal bro double klik dan terbuka piano roll, nah di piano rool itu kamu membuat notasinya… dengan Quantize yg anda tentukan sendiri
setelah semua project baik dari audio track dan midi track telah selesai,, saatnya melakukan mixing atau mebalancekan, 1 track dengan track lainnya, dengan membuka mixer… atau secara cepat, dengan menggunakan aplikasi yg di samping track yg ada pilih. untuk contoh mixernya seperti ini :


Setelah terbuka, kamu tinggal menurunkan dan menaikkan volume untuk membalance semua track,, untuk editing mastering, saya akan membahasnya lain kali… setelah selesai melakukan balancing, kembali ke project depan nuendo4… kamu harus melakukan penarikan terhadap kursor dari kiri ke kanan hingga batas akhir bar lagu tersebut… dan lakukan export file melalui menu file,,, kamu itnggal memilih mixdown berupa wave atau lainnya……
Selamat Berkarya Friend ………………………….

Tascam Digital Mixer DM - 3200

Tascam DM-3200 32-Channel 16-Bus Digital Mixer

The DM-3200 is a 32-channel digital mixing console with comprehensive DAW control and improved routing flexibility. This studio workhorse is Tascam's complete solution for professional DAW recording.
Ships to: Can ship to United StatesCan ship to CanadaCan ship to Puerto Rico
 
Tascam DM-3200 Mixer
 

Learn about the Tascam DM-3200 32-Channel Mixer

Manufacturer's Description for Tascam DM3200 32-Channel 16-Bus Digital Mixer

More channels. More inputs. The new TASCAM DM-3200 has more of everything that made the DM-24 a pedigreed studio workhorse. Plus an improved physical interface with per-channel multi-function LED ring encoders, more comprehensive DAW control, vastly improved routing flexibility, easier and robust data backup/ restore, greatly expanded mix storage using compact flash media and much more.

undefinedThe DM-3200 features 32 full-featured channels and 16 returns for a total of 48 channels at mixdown - even at its full 96kHz / 24-bit audio resolution. It has 4-band fully-parametric EQ and dynamics on every channel and two effects processors, each capable of running the built-in TC Works Reverb processor. Surround mixing is available with up to 6.1-channel panning, and the optional IF-SM/DM expansion card adds surround monitoring and downmixing to the DM-3200.

The DM-3200 provides a new way to record with DAW recording software. With the addition of an optional expansion card, the IF-FW/DM FireWire interface, the DM-3200 becomes a 24-channel computer audio interface, making it a complete studio solution for professional DAW recording. Built-in HUI and Mackie Control emulation allows the console to function as a flexible control surface for workstation software. This gives you the best of both worlds - total control over your recording software transport and mixing capabilities with the cue mixing, talkback, microphone preamps and world-class automation provided by the DM-3200.

Features

- 32 channels and 16 auxiliary returns for 48 total inputs
- 16 busses
- 8 Aux Sends
- 16 analog mic/line inputs with phantom power for condenser mics and analog inserts
- 24 channels of TDIF and 8 channels of ADAT built in
- 2 expansion card slots support optional FireWire, ADAT, AES/EBU, Analog & TDIF cards
- Dedicated cascade port supports cascade of two DM-3200s
- Per channel LED ring encoders for pan, aux sends and EQ
- Built-in DAW control
- All inputs, effects and processing are available at 96k -- no features are sacrificed at full sampling rate
- Transport controls
- Powerful automation with touch-sensitive motorized faders
- EQ and compression on each channel
- Two built-in effects processors at 44.1/48k or 88.2/96k
- Flexible routing
- Offload data to convenient Compact Flash media using built-in CF slot
- Optional MU-1000 meter bridge
- Stylish, professional design with rear panel I/O connections
-TASCAM Mixer Companion software (Win XP/OSX) with:
- Driverless USB connection to computer
-Backup/restore data via USB
- On screen timecode, transport and meter displays

(16) XLR analog mic/line inputs with phantom power for condenser mics
(16) 1/4 in. TRS Analog Inserts
(16) Balanced 1/4 in. TRS line inputs
(3x) 8-channel TDIF digital inputs and outputs
8-channel ADAT optical digital input and output
2 expansion card slots support optional FireWire, ADAT, AES/EBU, Analog & TDIF cards (listed below)
(2) Stereo AES/EBU digital inputs on XLR connectors
(2) Stereo S/PDIF digital inputs on coaxial connectors
(2) Stereo AES/EBU digital outputs on XLR connectors
(2) Stereo S/PDIF digital outputs on coaxial connectors
Stereo XLR balanced line outputs
1/4 in. Stereo TRS balanced Monitor outputs
Stereo RCA Studio outputs
Stereo RCA 2-Track input
(4) 1/4 in. TRS balanced Assignable Insert sends
(4) 1/4 in. TRS balanced Assignable Insert returns
RCA Timecode Input
MIDI In, Out and Thru connectors
BNC Word Sync Input and Out/Thru with termination
GPI output for replay control
RS-422 connector for device control
USB 1.1 connector
1/4 in. Footswitch jack
Dedicated cascade port supports cascade of two DM-3200 mixers
Connector for (optional) MU-1000 24-channel meter bridge

sumber : http://tascam.com/product/dm-3200/

Roland M-16DX 16 Chanell Digital Mixer

M-16DX: 16-Channel Digital Mixer

Revolutionary Digital Mixer and Audio Interface for the Studio and Stage

The new M-16DX is a breakthrough all-digital mixer and audio interface, with an unprecedented low price. Unlike analog mixers, the 24-bit/96kHz M-16DX offers powerful features such as high-resolution EQ, scene memories, and EDIROL’s innovative Room Acoustic Control. The M-16DX is a perfect front-end for your favorite Digital Audio Workstation (DAW), allowing you to record a track at a time or a whole band at once. It’s great for live mixing, too, with its compact and convenient two-piece design that allows you to put your connections onstage and your mixer wherever you want.
  • 16-channel all-digital mixer with 24-bit/96kHz internal processing
  • USB 2.0 audio interface for computer multi-track recording
  • All 16 inputs plus stereo main mix available to your DAW as individual audio streams
  • Compatible with all major Windows and Mac OS digital audio workstations
  • Cakewalk SONAR LE CD-ROM included
  • Perfect companion for Apple’s GarageBand
  • Easy-to-use operation with familiar analog-style mixer controls, excellent for live mixing
  • Convenient 2-piece mixer and I/O module design
  • Flexible analog and digital I/O, including four high-quality mic preamps with phantom power
  • 3-band sweepable EQ controls with graphic LCD for precise tone shaping
  • Scenes for instant recall of mixer settings
  • Exclusive Room Acoustic Control automatically tunes speakers for optimal sound
  • Built-in pro-quality effects, including COSM® insert effects, reverb effects, and finalize effects
  • AC adaptor and connection cable (2 meter, 6 ft.) included

24/96 Full Digital Audio Processing
Ready to upgrade the quality of your mixes? The M-16DX contains a powerful 24-bit/96kHz digital processing engine that provides a transparent mixing foundation. Experience the power of accurate, detailed digital mixing at a price you can afford.
18-in/2-out USB 2.0 Audio Interface
The M-16DX’s USB 2.0 port allows it to work as a multitrack audio interface with a digital audio workstation. You can assign any or all of the M-16DX’s individual mono or stereo channels, and the main stereo mix, to their own recording tracks in your DAW. Imagine recording an entire band at once, with each instrument and vocal on its own track.
Flexible I/O
Digital and analog connectivity—it’s all here, and more. The M-16DX has high-quality mic preamps with phantom power, Hi-Z switches for guitar and bass, balanced TRS connections, S/PDIF coaxial & optical digital inputs, line inputs for a turntable or CD player, audio from your computer via USB, and an mp3 player mini-jack input. On the output side, the M-16DX offers balanced TRS connections, USB audio to your computer, and coaxial & optical digital outputs. It even offers separate control room and main mix outputs.
Sweepable 3-Band EQ Controls
Each channel strip is equipped with Low-Cut Filter, 3-band EQ, Pan, Aux, Select, Solo/Mute and Level controls. The Midrange EQ has Q & frequency controls for precise tone shaping on each channel. With 24-bit/96kHz internal digital processing, the original audio source can be shaped using the onboard EQ and effects with absolutely no loss in audio quality.
EDIROL Innovation—Room Acoustic Control
In a portable mixing first, the M-16DX features a high-contrast, backlit LCD that lets you to see the effects in operation, as well as a spectrum analysis of your mix! Also onboard is the intelligent Room Acoustic Control function, which automatically analyzes and compensates for the frequency response of your studio. It’s fast, easy and effective.
Modular Mixing
Don’t let its small footprint deceive you—the M-16DX is a new-generation mixer comprising two modules: the mix controller for your desktop, and the I/O module, which can be mounted in a rack. Together, these two components provide a wide assortment of connection and processing features.
Powerful Built-In FX
A full-featured DSP effects processor is built into the M-16DX, with COSM® insert effects, reverb/echo effects and finalize effects.

Number of Input Channels
16 channels
AD/DA Conversion
Sample Rate: 44.1/48.0/96.0 kHz, Signal Processing: 24 bits
Frequency Response
96.0 kHz: 20 Hz to 40 kHz (+3/-3 dB), 48.0 kHz: 20 Hz to 22 kHz (+3/-3 dB), 44.1 kHz: 20 Hz to 20 kHz (+3/-3 dB)
Residual Noise Level (IHF-A, typ.)
MAIN MIX LEVEL knob = -∞, Channel LEVEL knobs = -∞, MAIN MIX LEVEL knob = U, Channel LEVEL knobs = -∞: -96 dBu, MAIN MIX LEVEL knob = U, Channel LEVEL knobs = U: -83 dBu
Nominal Input Level
MIC connectors 1–4: -60 to -10 dBu, LINE IN jacks 1–4: -40 to +10 dBu, * Maximum input level: Nominal input level + 22 dB, LINE IN jacks 5–16: +0 dBu, LINE IN jacks 15–16 (RCA pin type, Stereo miniature phone type): -10 dBu, * Maximum input level: Nominal input level + 18 dB
Input Impedance
MIC connectors 1–4: 1.5 kΩ, LINE IN jacks 1–4: 20 kΩ, LINE IN jacks 5–16: 20 kΩ, LINE IN jacks 15–16 (Stereo miniature phone type): 14 kΩ
Nominal Output Level
MAIN OUT jacks/ALT OUT jacks/AUX SEND jacks 1–2: +0 dBu, 2 TRACK OUT jacks L–R: -10 dBu, CONTROL ROOM jacks: -6 dBu, * Maximum output level: Nominal Output Level + 22 dB
Output Impedance
MAIN OUT jacks/ALT OUT jacks/AUX SEND jacks 1–2: 600 Ω, 2 TRACK OUT jacks L–R: 1 kΩ
Recommended Load Impedance
10 kΩ or greater
Display
Graphic LCD 122 x 32 dot (with back-light)
Connectors (I/O module)
MIC connectors 1–4: XLR type (balanced / phantom power +48 V), LINE IN jacks 1–14: 1/4 inch TRS phone type (balanced), * LINE IN jacks 1–2: supports use of hi-impedance, LINE IN jacks 15–16: RCA pin type, MAIN OUT jacks L–R: 1/4 inch TRS phone type (balanced), ALT OUT jack L–R: 1/4 inch TRS phone type (balanced), AUX SEND jacks 1–2: 1/4 inch TRS phone type (balanced), 2 TRACK OUT jack L–R: RCA pin type, DIGITAL INPUT jack/connector: Optical type, Coaxial type, DIGITAL OUTPUT jack/connector: Optical type, Coaxial type, USB Connector, DX BUS Connector: D-SUB 15 pin
Connectors (MIX controller)
LINE IN jacks 15–16: 1/4 inch phone type (unbalanced), Stereo miniature phone type, PHONES jack: Stereo 1/4 inch phone type, CONTROL ROOM jacks L–R: 1/4 inch phone type (Impedance balanced), DX BUS Connector: D-SUB 15 pin
DSP processing
Room Acoustic Control (Built-in Microphone), 16 Band Graphic EQ, Finalize: Enhancer/Multi-band Compressor-Limiter, Insertion effects: Power compressor/Vocal enhancer/Narration enhancer, Echo/Reverb: Short echo/Echo/Room reverb/Small hall reverb/Large hall reverb
Number of USB Audio Record/Playback Channels
Record: 18 channels, Playback: 2 channels, Full duplex, * When using the mixer as a USB audio interface, the Finalize effects are not available in 96 kHz mode.
Power Supply
DC 9 V (AC adaptor)
Current Draw
1.4 A
Phantom Power
+48 V/5 mA (each input)
Accessories
Owner’s manual, Read this first/M-16DX driver installation (driver installation manual), Controller cable (D-SUB 15 pin, 2 m), USB cable, Driver CD-ROM, SONAR LE CD-ROM, AC Adaptor, Rack-mount adaptor, Rubber feet (I/O module), Roland software license agreement
Option
Controller cable: DXC-7 (D-SUB 15 pin, 7 m)
System requirements [Windows]
Operating System
Microsoft(R) Windows(R) XP Home Edition Service Pack 2 Microsoft(R) Windows(R) XP Professional Service Pack 2 Microsoft(R) Windows Vista(TM) * This does not work with the 64-bit Edition of Windows Vista(TM).
Computer
Windows XP or Windows Vista compatible computer with a USB connector that supports USB Specification Revision 2.0 or higher * Intel chipset is recommended. * M-16DX’s USB Audio Interface may not perform to its full specs when used with Celeron or Intel compatible processors. * When using an added USB 2.0 interface card, such as a PCI card, "NEC PCI to USB Enhanced Host Controller" is recommended.
CPU/Clock
Pentium 4 Processor / 1.6 GHz r higher, Pentium M Processor / 1.3 GHz or higher
Memory (RAM)
512 MB or more * In case of Windows Vista, 1 GB RAM or more is recommended.
System requirements [Macintosh]
Operating System
Mac OS X v10.4.3 or later * The driver can work on both Intel processors and PowerPC processors (Universal Binary). * This will not operate in the Classic environment of Mac OS X. When using this, the Classic environment must not be running simultaneously.
Computer
Apple Macintosh series computer with on-board USB 2.0
Size and Weight ( I/O module )
Width
280 mm
11-1/16 inches
Depth
219 mm
8-5/8 inches
Height
44 mm
1-3/4 inches
Weight
1.6 kg
3 lbs. 9 oz.
Size and Weight ( MIX Controller )
Width
311 mm
12-1/4 inches
Depth
216 mm
8-1/2 inches
Height
46 mm
1-13/16 inches
Weight
1.2 kg
2 lbs. 11 oz.
* Please remember that multitrack recording at higher bit rate and sampling frequencies may require large amounts of free disk space and fast hard drives.
* This product has been tested on representative computers that meet the system requirements, but we cannot guarantee that it will operate on every computer that meets these requirements. Please be aware that even under the same conditions, differences in the operating environment may produce differences in processing capability.
*The specifications are subject to change without notice.
 
Downloads & Updates
M-16DX System Program Version 2.0
This archive contains MIDI files to update the M-16DX System Program via USB port. The following functionality has been added:
  • DAW controller function
  • Scene Edit function
  • The number of scenes has increased from eight to sixteen
This update is via MIDI, therefore a MIDI sequencer is required to transfer the SMF files to the M-16DX. Depending on the sequencer, it may not be able to playback large amount of system exclusive messages. Note to PC Users: If you are having problems sending these files from your sequencer, or if you need a sequencer to send these files, download the PCSMF Update Application located here. If you do not have a program to unzip this download, you can download WinZip here. Note to Mac Users: You will need the UPD SMF Update Application if you do not have access to a sequencer program.
M-16DX Driver Version 1.0.0 for Windows 7 32-bit Edition
This is the EDIROL M-16DX driver for Microsoft(R) Windows 7. This driver also supports ASIO (Steinberg Audio Stream I/O Interface).
M-16DX Driver Version 1.0.0 for Windows 7 64-bit Edition
This is the EDIROL M-16DX driver for Microsoft(R) Windows 7 64-bit Edition. This driver also supports ASIO (Steinberg Audio Stream I/O Interface).
M-16DX Driver Version 1.0.1 for Windows Vista 32-bit Edition
This is the EDIROL M-16DX driver for Microsoft(R) Windows Vista(TM). This driver also supports ASIO (Steinberg Audio Stream I/O Interface).
M-16DX Driver Version 1.0.0 for Windows Vista 64-bit Edition
This is the EDIROL M-16DX driver for Microsoft(R) Windows Vista(TM) 64-bit Edition. This driver also supports ASIO (Steinberg Audio Stream I/O Interface).
M-16DX Driver Version 1.0.1 for Windows XP
This is the EDIROL M-16DX driver for Microsoft(R) Windows(R) XP Home Edition/Professional.
M-16DX Driver Version 1.0.0 for Windows XP 64-bit Edition
This is the EDIROL M-16DX driver for Microsoft(R) Windows(R) XP Professional 64-bit Edition.
M-16DX Driver Version 1.0.0 for Mac OS X 10.7
M-16DX Driver Version 1.0.0 for Mac OS X 10.6
This is a driver for using the GT-PRO with Mac OS X 10.6 (Snow Leopard).
  • Compatible with Apple's standards of CoreMIDI
  • Universal Binary Driver (32-bit and 64-bit drivers)
  • Single/Multi processor support
  • Compatible with Mac OS X v10.6 "Snow Leopard" as of Sep. 9, 2009
M-16DX Driver Version 1.0.1 for Mac OS X
This is a driver for using the EDIROL M-16DX on Mac OS X Supporting for 10.5(Leopard).
  • Compatible with Apple's standards of CoreAudio
  • Universal Binary Driver (This driver can work on both Intel and PowerPC processors.)
  • Single/Multi processor support
  • Can customize driver buffer size and managing precise recording and playback latencies
  • Compatible with Mac OS X v10.5 "Leopard" as of OCT. 26, 2007
 
If you have questions about operating your Roland, BOSS or Cakewalk product, please check our Knowledge Base for answers to the most common questions.
You can also contact our Product Support department by phone or email.
Product Manuals
M-16DX Addendum (M-16DXVersion2_AD.pdf)
M-16DX Owners Manual (M-16DX_OM.pdf)
Support Documents
M-16DX TurboStart
M-16DX Workshop 01: Getting Started with the M-16DX
This booklet introduces you to the M-16DX, providing a tour of its mixing controls and presenting some important underlying concepts. The booklet also explains how to set up the M-16DX system.
M-16DX Workshop 02: Inputs and Outputs on the M-16DX
The M-16DX has an impressive variety of inputs and outputs. This booklet explains where they are, what they're for, and how to use them.
M-16DX Workshop 03: Basic Signal-Flow Tutorial
In this booklet, we'll take you through the steps for getting audio from a mic into, around, and out of the M-16DX. The booklet's both a simple how-to and a detailed explanation of signal flow in the M-16DX, an important thing to understand in any mixer.
M-16DX Workshop 04: Live Mixing with the M-16DX
The M-16DX makes a great compact live mixer, with killer sound and a flexibility you'll come to really appreciate at show time. This booklet takes you from setup to soundcheck to performance, with instructions, tips, and strategies.
M-16DX Workshop 05: Using the M-16DX with a DAW
The M-16DX makes a great front end for a computer-based DAW (digital audio workstation) recording studio. This booklet gets you started, with explanations of universal DAW concepts. It also takes you through the downloading and installation of the necessary M-16DX drivers.
M-16DX Workshop 06: Using the M-16DX with SONAR LE™
If you're a SONAR LE™ user (SONAR LE ships with the M-16DX) read the Using the M-16DX with a DAW Workshop booklet, and then read this one. It provides specific instructions for setting up SONAR LE for use with the M-16DX. *SONAR LE™ is a trademark of Twelve Tone Systems, Inc. Twelve Tone Systems, Inc. is not associated or affiliated with Roland in any manner.
M-16DX Workshop 07: Using the M-16DX with GarageBand™
If you're an Apple™ GarageBand™ user, read the Using the M-16DX with a DAW Workshop booklet, and then read this one. It provides specific instructions for setting up GarageBand for use with the M-16DX. *Apple™ and GarageBand™ are trademarks of Apple Inc. Apple Inc. is not associated or affiliated with Roland in any manner.
M-16DX Workshop 08: Using the M-16DX with SONAR
If you're a SONAR™ user, read the Using the M-16DX with a DAW Workshop booklet, and then read this one. It provides specific instructions for setting up SONAR for use with the M-16DX. *SONAR™ and SONAR LE™ are trademarks of Twelve Tone Systems, Inc. Twelve Tone Systems, Inc. is not associated or affiliated with Roland in any manner.
M-16DX Workshop 09: Using the M-16DX with Logic Pro™
If you're an Apple™ Logic Pro™ user, read the Using the M-16DX with a DAW Workshop booklet, and then read this one. It provides specific instructions for setting up Logic Pro 8 for use with the M-16DX. *Apple™ and Logic Pro™ are trademarks of Apple Inc. Apple Inc. is not associated or affiliated with Roland in any manner.
M-16DX Workshop 10: Using the M-16DX with Cubase
If you're a Cubase™ user, read the Using the M-16DX with a DAW Workshop booklet, and then read this one. It provides specific instructions for setting up Cubase for use with the M-16DX. * Cubase™ is a trademark of Steinberg Media Technologies, GmbH. Steinberg Media Technologies, GmbH is not associated or affiliated with Roland in any manner.
M-16DX Workshop 11: Using the M-16DX with Digital Performer
If you're a Digital Performer™ user, read the Using the M-16DX with a DAW Workshop booklet, and then read this one. It provides specific instructions for setting up Performer for use with the M-16DX. * Performer™ is a trademark of Mark of the Unicorn, Inc. Mark of the Unicorn, Inc. is not associated or affiliated with Roland in any manner.
M-16DX Workshop 12: Using the M-16DX with Ableton Live
If you're an Ableton Live™ user, read the Using the M-16DX with a DAW Workshop booklet, and then read this one. It provides specific instructions for setting up Live for use with the M-16DX. * Ableton Live™ is a trademark of Ableton. Ableton is not associated or affiliated with Roland in any manner.
M-16DX Workshop 13: M-16DX EQ
What's a great mixer without EQ? The M-16DX supplies all the EQ you'll need for recording, live mixing, and audio/video production, and this booklet explains how to use it.
M-16DX Workshop 14: The M-16DX Effects
The M-16DX contains reverb, echo, and a host of helpful insert effects. Learn how to operate and tweak them in this booklet.
M-16DX Workshop 15: Tuning Your Room with RAC
One of the most innovative features of the M-16DX is its Room Acoustic Control, "RAC." RAC can automatically customize the M-16DX's output to compensate for acoustic issues in your studio or performance venue. This booklet tells you how to put RAC to work for you.
M-16DX Workshop 16: Using Scenes on the M-16DX
One of the biggest advantages of a digital mixer like the M-16DX is its ability to remember your settings for you, and to recall them in a heartbeat. The M-16DX does this using its 16 "scenes." You'll learn how to create, edit, save, and recall scenes in this booklet.
M-16DX Workshop 17: Creating Submixes Using the Mute/Alt Bus
The M-16DX's Mute/Alt system provides an extra stereo bus you can use for a submix when you'd like to simultaneously control an entire group of related sounds with a single set of controls. This booklet explains how to create a submix on the M-16DX.
M-16DX Workshop 18: Using the M-16DX's Finalize Tool
To make your stereo mixes sound as great as possible, the M-16DX offers Finalize, which can smooth out and tighten-up your work. Learn how to use Finalize in this booklet.
M-16DX Workshop 19: Using the M-16DX as a DAW Controller
With Version 2.00 and higher software, the M-16DX can act as a control surface for such popular DAWs as SONAR LE, SONAR, Logic Pro, and Live. You can control these DAWs without taking your hands off the M-16DX you're already using as their multi-channel audio interface. Here's all you need to know about how to use the M-16DX as a control surface. *SONAR™ and SONAR LE™ are trademarks of Twelve Tone Systems, Inc. Twelve Tone Systems, Inc. is not associated or affiliated with Roland in any manner. Apple™ and Logic Pro™ are trademarks of Apple Inc. Apple Inc. is not associated or affiliated with Roland in any manner. Live™ is a trademark of Ableton. Ableton is not associated or affiliated with Roland in any manner.
M-16DX Workshop 20: Using the M-16DX as an Onstage Submixer
If you're playing in a band, the M-16DX makes a great personal onstage submixer. Learn how to get your own monitor mix as you deliver your own killer mix of your sounds to the house engineer.
M-16DX Version 2.0 Brochure
M-16DX Brochure
 
Sumber : http://www.rolandus.com/products/productdetails.php?ProductId=860


Keyboard:
61-key semi-weighted synth action keyboard (World class Fatar® Technology)
CPU:
2.8 GHz Core2Quad™
Control Surfaces:
Pitch Bend and Modulation Wheels, Trackpad with 2 Buttons, External Keyboard (“QWERTY”) Module, Assignable Alpha II Control Module (5 Faders, 5 Modes Buttons, 3 Transpose Buttons, 5 Directions Buttons and 5 Transport Buttons).
Memory:
4GB RAM
Expansion Slots:
(1) 5.25” Dual-Layer DVD-RW burner (8.5GB/disc)
Audio I/O:
(1) High Performance Audio I/O Card with Low Latency including 24-bit/96kHz professional 10-in/10-out : (2) mic/instrument preamp inputs (with Phantom Power 48V), ( analog line inputs, (10) analog line outputs, S/PDIF digital I/O (coaxial), (1) Headphone Jack with Volume Control
Storage:
4 Terabytes
Drive:
High Speed Dual-Layer 8.5GB/Disk CD and DVD Burner
Display:
Internal 15” Color Touch Screen LCD High Resolution (1024 x 768), External Video port for running Dual Monitors or a Video Projector
Connection:
Midi In/Out
1) Sustain and (1) Expression ports,
2) 4 USB 2.0 ports (2 external/2 internal)
3) (1) FireWire 400 port
4) (1) Gigabit (10/100/1000) Ethernet port
5) (1) Headphone Jack with Volume Control
Software:
Microsoft® Windows® XP Home, Open Labs Custom GUI (Graphic User Interface), Open Labs Riff®, Open Labs mFusion®, Open Labs Karsyn®, Open Labs MimiK, ChickenSys Translator™, Reaper, Guru, Ableton Live 7
PREMIUM Factory Sound Library V5:
Thousands of sound presets installed including True Pianos, Sylenth, Digital Sound Factory Proteus 2000, MoPhatt, Virtuoso, Wusik Station, Denaun Porter Master Series sound library, Acronus OEM, 3G Sounds, Purity
Included Accessories:
Power Cable, Quick Start Guide, Allen Wrench
Power Supply:
500+ Watt Power Supply, Whisper Quiet Cooling Fans (Internal Chassis, Processor & Power Supply)
Dimensions:
46”(W) X 20”(D) X 7”(H), Weight (base configuration) 46 lbs.
Komentar
  1. 0
    0
     
    Rate This
    Assalamualaokum
    Sebelumnya perkenalkan Nama saya R.Gamal Abdullah AKbar
    Saya tinggal di bogor dan sy bekerja di PT Jasa Marga (Persero) Tbk,,sedang saya juga seorang musisi (Band Jasa Marga “ALEBA BAND” Dan Juga pernah bergabung di Djakarta LLoyd’s Band thn 1990 s.d 1997).dan sy sendiri memainkan alat musik petik yaitu Gitar.
    Adapun dengan ini karena job di Group Band makin surut ,saya berubah profesi ke Solo Keyboard dimana posisi ini tentu baru buat saya, barangkali Bang Syarifudin Siregar punya kiat kiat untuk bermain K-Board solo dan barangkali bisa share dlm masalah ini.
    1. saya mau nanya tentang K-Board Open Labs Neko XXL, yg canggih itu kira kira berapa harganya dan sulit atau mudah kah cara pengoperasiannya.
    2. kalu boleh saya request ? saya minta di kirim Style utk Yamaha PSR 300 lagu² Pop Indonesia yang sekarang.
    Demikian sekelumit pernyataan dan perkenalan saya, tentunya ini saya mohon maaf tentang request saya kalau keberatan tidak apa dan sy tidak mengurangi rasa hormat sy kepada anda.
    Wassalam
    Best Regards
    R.Gamal AKbar
    (malce1945@aol.com)
    • ferrysiregar mengatakan:
      0
      0
       
      Rate This
      waalaikum salam bang. wah senang nih ketemu sama musisi senior…
      untuk hal yang
      1. neko xxl : keyboard tersebut sangat canggih bang. dan harganya wuihhh, mahal sekali sekitaran 40 – 50 juta lebih
      untuk pengoprasiannya dari yang saya liat di media shared video,, hampir sama penggunaanya dengan keyboard yang portable lainnya, hanya saja ada beberapa perbedaan
      seperti adanya plugin korg legacy (contoh untuk synth) dan penggunaanya sendiri hampir sama seperti kita menggunakan DAW di komputer bang.
      2. saya mohon maaf sekali saya belum punya style PSR bang :)

Korg Pa 500 Arranger

korg pa 500

Arranger Keyboards

Introducing the Korg Pa500

The “Baby Blue” – The Professional Arranger at an entry level price
For the musician, composer, performer and entertainer, the interactive Pa500 arranger keyboard is the perfect musical partner. Like its big brothers – the Pa800 and the Pa2X Pro – the Pa500 uses our RX (Real eXperience) technology to deliver a sound unprecedented in an ordinary arranger keyboard. With exclusive Korg features such as the XDS Dual Sequencer, intuitive TouchView interface, quarter-tone on-the-fly and a four way joystick for realistic articulation, the only thing really missing is a big price tag.
Stunning Sound in a Sensational Professional Arranger Keyboard
It all begins with sound. Based on the EDS (Extended Definition Synthesis) engine found in the Korg M3, Pa800 and Pa2XPro, the Pa500 provides 80 voices of polyphony and an awe-inspiring quality of sound. Over 880 fully editable sounds are preloaded (including a full GM soundset and 56 drum kits), representing a full range of musical instruments from almost every genre – each exploding with depth, nuance, subtlety, accuracy and richness. The User area has space for up to 128 user sounds and 64 drum kits.
Listento demos of the Pa500′s amazing sounds.
Effects Everywhere
For many years, Korg music workstations, synthesizers and digital recording studios have included outstanding studio quality effects that are simply spectacular. In that same tradition, the Korg Pa500 accompaniment keyboard offers four stereo processors plus a Final semi-parametric, three-band EQ containing a treasure trove of effects, from rich reverbs and dazzling delays to guitar-type modeling effects from Korg’s renowned REMS series – 124 different effects in all. And you’ll appreciate the separate three-band EQ on each track so you can shape the tone for that perfect sound.
A Professional Arranger Done with Style
No doubt about it: Korg’s Style programming is world class. The Pa500 delivers a deluxe set of styles, programmed by some of the leading arrangers in the world; each of whom worked according to their musical strengths. The result is over 320 preloaded Styles that provide unparalleled realism and detail, adding anything from tasteful guitar picking, a tight bass and drum groove, a powerhouse R & B rhythm section and all the way up to a full orchestra! Styles follow your timing, voice leading and chord changes to create an amazingly defined musical performance in real-time. With up to eight parts, four variations, three intros/count-in, three fills/break and three endings, each Style is a complete musical environment. Additional parts or “riffs” can be sequenced and triggered in real time using the assignable Pads. Advanced features such as Syncro Start/Stop, Fade In/Out, Assignable Pads, Tap Tempo and Manual Bass allow you to spontaneously add complex and professional touches to your performances.
Guitar mode
Creating convincing guitar parts from a keyboard has never been easy – until now! When creating a guitar part for your Style, you can chose a chord, capo position, and literally transform the keyboard into the fretted strings of the chord to allow realistic picking patterns, strums, chokes, slides, hammer-ons and other “guitar-specific” artifacts. The result is stunning. Best of all, the Pa500 home keyboard can automatically enhance the guitar tracks of existing Standard Midi Files.
All together now
Need to switch sounds fast? Four STS (Single Touch Settings) buttons allow you to have up to four sounds split and layered across the keyboard and switch them all instantly with a single button press. The STS assignments can also be saved independently for each Style. Each of the 256 Performance settings can instantly recall the Style, Sounds, effects, tempo, key and scale used to perform a particular song.
Creative sequencing scenarios
In addition to traditional “track at a time” workstation sequencing, the Backing Sequencer of this interactive keyboard allows you to create songs quickly and easily by capturing multiple Style driven parts at once. You don’t need to be a master programmer – even beginners can write their own songs in minutes. In fact, you don’t even need to play at all! Using the Step Edit/Entry feature, you can simply type in the chord changes, fills and style changes in step-time – a big boost for arrangers and non-keyboardists. This quick approach to programming is also useful in the studio for creating professional, great-sounding backing music for commercial, film, video, multimedia or internet applications. The sequencer provides massive editing power – you can even edit the tone parameters of each track.
Non-stop entertainment
With Korg’s XDS Dual Sequencer, one can load as the other plays, and a DJ-style cross fader can blend between them, providing a seamless, continuous musical performance. The Pa500 arranger keyboard can also playback SMF (Standard Midi Files), Karaoke files, and GM (General MIDI) files – and is able to display lyrics in most popular karaoke formats. There is also a practical Marker function to allow you to jump directly to a given position in the song: you can fix the markers using the internal sequencer (or using a computer based one – the marker format is standard) and then remix your favorite songs during a live performance for added spontaneity.
Korg’s Expanding SongBook Feature
The exciting SongBook feature was developed to make your life easier while playing live. The SongBook is a Musical Database, completely user programmable, containing all the settings needed to play a particular song. You have only to search for the song you would like to play by Song Title, Genre, Artist, Tempo, etc. and press “play”. Each SongBook entry will instantly recall every setting you’ve saved in order to play that song perfectly – Sounds, Style, Performance, Volumes, Muted Tracks, FX settings, Easy Edit, STS settings, Master Transpose and more. This indispensable musical feature is unique to Korg.
Less is more
With all the technological power packed inside, it was vital that we also made the Pa500 arranger keyboard easy to understand and easy to use. But we went even further, creating an instrument that provides an intuitive, musical, fast, foolproof experience. With our amazing TouchView display you can simply think, see and touch the panel for easy and intuitive control. So that musicians of all levels can make great music quickly, there are two interface modes: Easy and Expert. Easy mode shows only the essential elements with bright, bold icons – useful for beginners or playing live – while Expert mode provides full editing control. And when you need more information, check out the on-board contextual Help System – in any of seven languages! In addition to 61-velocity sensing keys, the Pa500 arranger keyboard provides a four-way joystick, assignable switch, assignable slider, assignable pedal jack and four pads provide the tools to spice up your performance by changing effect settings, adding or muting parts, slowing the tempo, or even adding “mini-sequenced” solo, arpeggio, or backing riffs. Nothing stands between you and your professional performance.
Save it for later
In addition to providing a USB/MIDI computer connection for moving and saving data, the Pa500 can also save and read data from SD / MMC memory cards for instant access to your custom data, MIDI files and songs. The back panel also features MIDI (In, Out), Audio Ins (1, 2) and Outs (L, R), headphone jack, plus a damper pedal and an assignable pedal connection.
All-in-one
Hiding inside is a full stereo sound system with two double cone speakers in a bass reflex enclosure for the best sound in a small box. The Pa500 is completely self-contained and easily transportable – whether rushing to perform live in front of any size audience, jamming with friends, or teaching a new tune to the other players. We couldn’t fit any more fun in here if we tried.
Sumber : http://www.korg.com/product.aspx?pd=294
Komentar
  1. ferdymanid mengatakan:
    0
    0
     
    Rate This
    bang ferry yang baik hati sedunia…hehhhe..ngerayu lagi nih bg..
    sy mw tanya gmn caranya bikin intro lagu sebanyak 8 bar dg perpindahan akord dr C-Am-F-G…mnggunakan fitur guitar mode pada korg pa500..
    1.sy udah rekam part gitarnya 8 bar
    2.turnkan oktaf smpe nada C1
    3.sdh mngatur velocity di event edit tiap not nya (jreeng gitarnya nya)
    4….pliss bnget bang ferry..sdh hmpr 6 bulan ga paham2 nih..
    • ferrysiregar mengatakan:
      0
      0
       
      Rate This
      maaf baru balas…. gimana ya saya juga bingung nih karena dah hampir 1 taon gak pegang keyboard arranger jadi rada lupa,, hehehhehehe……. sudah coba berkonsultasi ma mas HG PELANGI ???.. kl belum coba aja di tanya.. mas HG lebih tau mengenai ini… semoga bisa membantu….
  2. Beat Maker mengatakan:
    0
    0
     
    Rate This
    Looks like your site is getting alot of visitors. Are you doing any time of special coding to make your site appear so well in the search engines? Great Job!

Behringer Umx 61 Keyboard Controller

 
UMX61 keyboard controller
  • Unleash your creativity and play 50 virtual instruments and synthesizers, take off with an unlimited number of sound creations. Download more free instrument plug-ins and host software from www.behringer.com
  • Velocity-sensitive USB/MIDI keyboard featuring 61 full-size keys and unbeatable programming versatility, real-time control and playability
  • USB/audio interface to connect your instruments and mixer, etc. to your computer for recording and playback
  • Powerful DAW software Ableton Live Lite 4 BEHRINGER Edition included
  • Plug and play with Mac OS X and Windows XP
  • 8 real-time rotary controls plus 10 assignable switches
  • Freely assign MIDI control changes to the modulation wheel, volume fader and pedal port for ultimate flexibility
  • Full 128 tone range via the octave shift function with multi-purpose LED status indication
  • Separate MIDI Out allows controlling external samplers, synths and other equipment
  • Runs via USB, batteries or a power adapter (not included)
  • High-quality components and exceptionally rugged construction ensure long life
  • Conceived and designed by BEHRINGER Germany
Selama saya menggunakan umx61 saya tidak pernah mendapati kesulitan… dengan tombol navigasi yg dekat dengan Tuts memudahkan kita tuk realtime editing… dengan melakukan Learn pada keyboard ke module yg kita gunakan….
Port kabel usb yg du gunakan sebagai power dan media cable midi… memudahkan kita tuk mencari pengganti cable midi.. dengan cukup membeli port cable printer ke Toko2 Computer…..
Komentar
Dion mengatakan:
0
0
 
Rate This
Haloo bang ferry….
Salam Kenal yaaaa :0 Saya tertarik dengan artikel2 di blog anda !!!!
Saya Punya Keyboard Controller UmX49, Fruityloop, Sound card bundled UCA, Frutyloops !!! Saya mau tanya, kira2 VSTi apa yang bagus selain bawaan dari Fl ??? Saya lagi cari Vsti Pianoo…..
Makasihhhh yaaa….
ferrysiregar mengatakan:
0
0
 
Rate This
kalau untuk vsti piano gunakan the grand aja.. suaranya mendekati real :)
Dion mengatakan:
0
0
 
Rate This
Bang ferry,,,,,dimana saya bisa dapet Vsti instrument strings or brass yg free ???
Saya mau tanya, Bang ferry pak keyboard apa n Vsti apa saja ??? :)
Makasih buat sharingnyaaa….